# Power Omni Installation

{% hint style="danger" %}

### Attention:

Before starting, it is mandatory to access and follow the pre-installation steps (link below) to enable the required access permissions in your Azure environment.

[Pre-Installation Guide](/en/pre-installation-guide.md)
{% endhint %}

***

### Step 1: Start and Login

<figure><img src="/files/LOx1NhH9rmB3kRhPG6zS" alt=""><figcaption></figcaption></figure>

1. Go to the main website: [poweromni.ai.](https://poweromni.ai/)
2. Click the **“Teste agora”** button.
3. You will be redirected to the login page. Sign in using your **Microsoft Account** tied to the Azure environment where Power Omni will be installed.

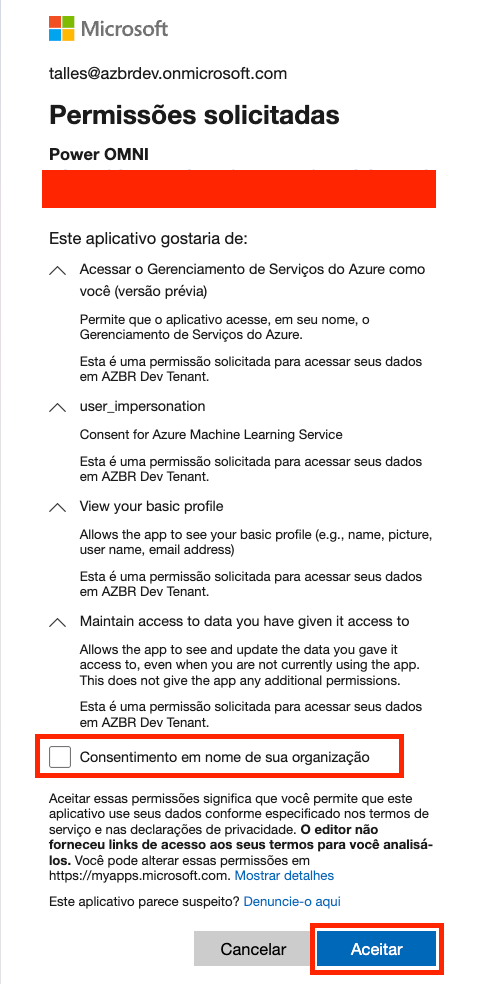
<figure><img src="/files/QpIYLADefJiLJ7RJDtp2" alt=""><figcaption></figcaption></figure>

* Immediately after logging in, a pop-up will appear asking for consent to use Power Omni on behalf of your organization.
* You must grant this consent so Power Omni can obtain the required permissions and proceed with installation.

### Step 2: Company Registration and Terms of Use

After logging in, fill in your company registration details:

<figure><img src="/files/daHKAyEUEsbHSQ3842mr" alt=""><figcaption></figcaption></figure>

1. When entering the CNPJ or CPF, the data should load automatically. However, if this does not happen, you will need to manually fill in the information.
2. Fill in the required information: CNPJ, Company Name, Full Address, etc.
3. **Municipal Code (Important):** In the address field, enter the city code according to the IBGE table.

<figure><img src="/files/bApWOxv0w3gcexOOMAxD" alt=""><figcaption></figcaption></figure>

{% hint style="info" %}
💡 **Tip:** Click the information icon next to the field to be redirected to the IBGE website and check the correct municipal code.
{% endhint %}

3. Read and accept the platform’s Terms of Use.

<figure><img src="/files/wNGah8JJCPdu29Pmiyyw" alt=""><figcaption></figcaption></figure>

{% hint style="info" %}
To access the full document, click **Terms of Use**. The file will open, allowing you to read, download, or print it.
{% endhint %}

### Step 3: Choose the Installation Method

On the installation screen:

<figure><img src="/files/4HznAjnVNfiDSqYP4tmm" alt=""><figcaption></figcaption></figure>

1. **Method Selection:** Choose the **Automatic Installation** option (best option).
2. **Azure Subscription:** In the appropriate field, select the Azure Subscription where Power Omni resources will be provisioned.

<figure><img src="/files/G4lSwXJSDDnAV2u9Cr4j" alt=""><figcaption></figcaption></figure>

### Step 4: Resource Configuration

On the Automatic Installation page, you will see the Azure resources that will be provisioned.

<figure><img src="/files/xwaNTry82Xpegrp2jsJV" alt=""><figcaption></figcaption></figure>

<table data-header-hidden><thead><tr><th width="222">Configuration</th><th>Recommended Action</th></tr></thead><tbody><tr><td>Resource Group and Azure AI Foundry</td><td>No need to change. You can keep the default name.</td></tr><tr><td>Project Name and Region (Field 3)</td><td>You may change the Project name if desired. For Region, we recommend keeping <strong>eastus</strong> or <strong>eastus2</strong>.</td></tr><tr><td>AI Model</td><td>You may change the model that will be used as the base. We recommend starting with the default (e.g., <strong>gpt-4.1 mini</strong>).</td></tr><tr><td>Quota Validation</td><td>AFTER selecting the model, click <strong>"Validate Quota"</strong>. This step checks whether your Azure subscription has the required capacity (Quota) to provision AI services.</td></tr></tbody></table>

<figure><img src="/files/ZsfAxdmcvOkxD23MpUj2" alt=""><figcaption></figcaption></figure>

<figure><img src="/files/KmuhhQqpu2C2U9gpRTa9" alt=""><figcaption></figcaption></figure>

#### First AI Agent Configuration

* You may change the name and initial instructions of your Default Agent on this screen.
* If preferred, you can edit this Agent later after installation in the Administration Portal.

<figure><img src="/files/bQ8gE5HHl6ef6ztSqgm0" alt=""><figcaption></figcaption></figure>

After filling in and validating all information, click the **"Start Installation"** button.

### Step 5: Provisioning Completion

Wait for the system to complete provisioning the resources in your Azure tenant. The waiting time may vary.

<figure><img src="/files/D8GOyFWuqgHfYeab1XUY" alt=""><figcaption></figcaption></figure>

#### ⚠️ **Common Error Solution: Pop-up Blocked**

If an error occurs or the process does not proceed after clicking, check whether your browser blocked a new window (pop-up).

<figure><img src="/files/bbUSrip9KGNm9RnMKBKy" alt=""><figcaption></figcaption></figure>

1. **Allow:** Locate the pop-up block icon (usually in the browser address bar).
2. Click the icon and select the option to allow pop-ups.

<figure><img src="/files/3DEKK8yLsm3l9peQKUPh" alt=""><figcaption></figcaption></figure>

3. **Try Again:** After allowing the pop-up, try starting the installation again.

### Step 6: Finalization and Access

1. After provisioning is successfully completed, you will be notified.

<figure><img src="/files/7Vt1LuamBzgrWrhShlMQ" alt=""><figcaption></figcaption></figure>

2. Click **"Finish"** to complete the installation process.
3. Done! You will now have access to the platform, your default agent, and can start using Power Omni.

<figure><img src="/files/SK62hx7WMvVcgz4vhUt9" alt=""><figcaption></figcaption></figure>

4. Simply click on the **Default Agent** card (or the name you assigned to your agent), and the chat screen will open so you can start using Power Omni.

***

{% hint style="info" %}

### 🛠 Enterprise Support During the Trial Period

During the trial period, you have access to **Enterprise Support** directly via a WhatsApp group to assist you with the Power Omni implementation process in your company.

Simply send an email to: **<suporte@poweromni.ai>** requesting the creation of the group and informing your WhatsApp contact number.
{% endhint %}


---

# Agent Instructions: Querying This Documentation

If you need additional information that is not directly available in this page, you can query the documentation dynamically by asking a question.

Perform an HTTP GET request on the current page URL with the `ask` query parameter:

```
GET https://docs.poweromni.ai/en/power-omni-installation.md?ask=<question>
```

The question should be specific, self-contained, and written in natural language.
The response will contain a direct answer to the question and relevant excerpts and sources from the documentation.

Use this mechanism when the answer is not explicitly present in the current page, you need clarification or additional context, or you want to retrieve related documentation sections.